 Building A Feature Rockery
Building a rockery is heavy work, and heavy work is better done when the weather is cool.
Choose a cool time of year; or in the warmer months, a cooler time of day to do the work.
Why grow plants among rocks?
- Rocks, and the mosses and lichens that grow on rock surfaces, provide a variety of interesting textures and colours in the garden.
- Rocks can be used to visually separate pockets of plants.
- On sloping ground, rocks prevent the soil washing away from plant roots.
- Rocks help to suppress weeds growing amongst the plants.
- Rocks help to insulate plant roots (roots find cooler and moister soil under the rocks).
 WHERE TO BUILD A ROCKERY
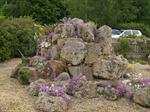
The most obvious place to build a rockery is on a slope, where it serves the same purpose as a retaining wall. The rocks are embedded in the slope, with the aim of simulating a natural rock outcrop. The crevices between the rocks are planted with bulbs, delicate alpine plants and small ground covers plants.
On flat ground, a rockery provides a sense of visual relief but care is needed to blend it into the garden. They work well in natural style settings such as behind ponds or adjacent to water courses. With the right design, rockeries can also look good built against a wall or in small odd-shaped corners of the garden.
If you have situations such as these and you want to create a little more interest in that part of the garden, think about incorporating a rockery – large or small; it can add something very special to that part of that garden.
WHAT TYPE OF ROCK?
The most common rocks used are basalt, sandstone and granite, and their availability and cost varies considerably. Rocks collected in the local area will often simply be sold as ‘bush rocks’.
Most people favour natural shaped rocks, but cut blocks can be used to create interesting rockery effects.
The size of the rock depends on how much you’re prepared to spend, both on the rocks and on manpower and equipment to move it. Big rocks certainly look stunning and if the garden is on a large scale, smaller rocks can sometimes look out of place. Big rocks however can be expensive to buy, and difficult to move.
Mosses and lichens often grow on rocks and most people consider these to be desirable features. In some cases, their growth can be adversely affected by moving the rocks from their point of origin and changing the light and moisture levels. For example, mosses grow naturally in moist shady areas, and if you move the rock to a hot dry position the mosses will die.
| TIP |
|
Avoid taking rocks from natural areas
This destroys natural habitats and leads to land degradation. Buy from reputable suppliers who are licensed to take rocks from development sites and quarries.
|
MOVING ROCKS
Don't try moving what you are incapable of moving!
If rocks you use are very large and heavy, you will need to be smart in the way you handle them.
The quickest method is to hire a machine (such as a small loader/tractor) for a day. Be careful though – rough handling can scratch the surface of the rock and destroy its natural appearance. It can cost more to hire a machine with a skilled operator, but a better and faster result can be achieved by someone with experience.
Medium to large rocks may be moved by hand if you have a little help:
- Crow bars can be used to slowly edge the rock along the ground and manoeuvre it into its final position. For large rocks you might need two crow bars and two people, working together; one holding the rock, while the other moves it into position.
- Ramps can sometimes be used to slide a rock up or down the slope if the area to be traversed is bumpy or contains potential snags.
- Wheelbarrows can be used to move rocks a longer distance, but only use a heavy-duty metal builders barrow. A plastic barrow will be destroyed quickly carrying rocks.
- Hand trolleys can be very useful, but only use heavy duty ones.
When building a rock garden, stand back and see if the rocks' alignment looks right. If not, then rearrange them so that they imitate natural contours of the land. |
When planted up, bulbs, ground covers and shrubs will grow to fill in the soil pockets left for them. |
What if the ground is Wet?
Don’t try to work on really wet ground – don’t even start to work on moist ground without first putting down matting, boards, gravel or mulch to walk over. It may be worthwhile digging a temporary spoon drain to help dry out the soil
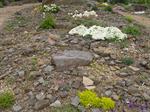
HOW TO ARRANGE ROCKS
There is no simple rule for deciding whether a rock is in the right position. It depends upon the shape of the land, the position of other rocks, the surrounding plants and the visual effect you are trying to achieve. Sometimes it will be necessary to adjust the rock more than once so that the best side of the rock is facing up.
- Rocks should be secure and stable. Ensure rocks are not likely to move in the future by having half to two-thirds of the rock buried below ground level; and ensuring anything below it is solid.
- Start building at the bottom of a slope, making sure the bottom rocks are embedded very solidly, and not likely to roll over or move due to subsidence in the future.
- Never put the top rock in place first, even if it is more accessible to work in that area first – you are less likely to get a pleasing effect, and more likely to create a rockery that will collapse in the future.
- As you place rocks higher up, ensure they are firmly anchored on the rocks below.
- Ensure higher rocks sit horizontally behind lower rocks. Any rockery should have a backward sloping face, and never an overall vertical face.
- Try to expose the parts of the rock that have been exposed previously (ie. already have a weathered face). and hide the parts that had been broken or had come from below the ground. This helps create a more natural appearance.
As you position the rocks, keep standing back and look at what you are doing from a distance and from different angles.
Planted Rock Walls
Build a rock wall with planting pockets in it. This needs to be built up one layer at a time, on a foundation.
1st Create a solid foundation - either dig a trench down to solid sub-soil, or if the wall is high and heavy, dig a trench and pour a concrete foundation below ground level.
2nd Build the first layer of rock; and then pack a good quality loam behind the rock.
3rd Leaving the odd pocket exposed to plant in, add the next layer of rock – with the face slightly behind the first layer (so the wall has a slope backwards).
4th Pack soil behind the second layer.
5th Continue with further layers leaving pockets for planting as you go, and being careful to retain the slope backwards.
6th Plant the pockets of exposed soil as soon as you are finished – the plants need to start growing ASAP so as to hold the soil in place.
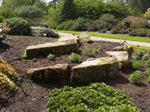
Natural Rockwork
Rocks look most natural when they at least 50% buried in the soil. A natural rockery is often built on a mound or slope, in an attempt to imitate nature. To achieve this effect, seek inspiration from nature. Look at how rocks occur in nature; in a wilderness area or beside a creek. Then try to imitate what you see.
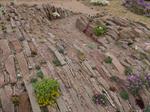
Abstract/modern rockwork
Unusually shaped rocks can be used as features in their own right. For example, a row or cluster of long thin rocks might be set in an upright position, giving the appearance of stone spires.
When sandstone is cut down the centre some remarkable patterns and colours can be found in the grain. Hues of ochre, cream, yellow and light brown are the predominate colours, and matching the patterns in the grain can create some interesting effects.
|
Watch the Drainage |
| When you add rocks to an area or reshape the ground, you are also changing drainage patterns. You need to be careful in doing this; you may create spots that are susceptible to becoming wetter or drier than they were before. |
LEARN MORE

BOOKS -Visit our online Bookstore for a large range of titles by our principal (John Mason) and staff.
More from ACS
Ebook - Inspiring: covers formal, natural, eclectic, modern, oriental, Mediterranean; zoom in on stunning images and plans.
View eBook
Ebook - Explores garden design ideas and inspires
garden design and landscaping!
View eBook
Great way to build on your gardening skills or as a beginner. Very comprehensive - covers the fundamentals.
View Course
Course - draw designs, survey sites, understand plants, soils, timbers, climate, and other landscape materials pivotal to the success of a good landscape design.
View Course
Become a Landscape Professional in 2 to 3 years
View Course